Tuesday 31 December 2013

Out with the OLD! Goodbye 2013!

I can't believe where this year has gone, I have to admit I can't wait to see the back of it to be honest!

Why? Because its has been one hell of a year for me and my family.
There have been highs and lows but mainly stressful lows I am sorry to say!


So seeing in the New Year 2014 will be very well received with great expectation!
I made many plans at the beginning of this year and I achieved very few of them, I will not be putting myself under anymore pressure that way, 2014 will just happen how it happens!!! I have stepped back and taken a look at my life throughout my 50th year and thought I just want to do what's right for my family and me!

So my daughter achieved great results in her GCSE exams back in the summer but it was a hard slog for her and it felt like I was doing them with her!  Her A-levels have also been hardwork too so far, as it has been a big jump from the GCSE's but she has now started to get to grips with them and slowly she is finding her feet and beginning to plan her time better and with a little help from a Maths tutor she is finding its getting better ~~ little steps!
 
Hubbie has serious back problems which is general wear and tear of his job but he struggles on, often has physio on it but there isn't much they can do really!  I think it will deteriorate more and more so its time for me to get out there and find a proper job, well more hours anyway.

So for me the new year will find me job hunting, what sort of job will be the main problem!!! This will mean less jewellery making for me, I do still intend to be beadmaking which can be fitted around a job but I just can't cope with both.

Jewellery making I will still do things just nowhere near what I used to do, saying that I hardly did any this year but that was due to other circumstances! I will make for myself and friends but I probably won't sell as much as I have in the past. I have been adding tutorials to my blog and I still intend to carry on with that.....  even though I haven't been very good over the last month or so... eek! 

I started it in the Blogtoberfest during October and I will try my best to post on Tuesday's my Top Tips day! I feel my blog is important to me and I would really like to build a following to help other jewellery makers out there. I have been starting with the basics and will build up to the more detailed things as I go along.

I have taken a little break from my magazine work but I do hope to get back to it next year as I have a couple of items I've promised to do, they are still in the planning stages but I must finish those as soon as I can get going again. 80))


I think that's about it  ~ Oh Ummmm....


I would just like to say I hope everyone out there in blogland had a great Christmas ~~

I enjoyed it ~~

I got some new tools which I can't wait to have a little go with ASAP


and some new books with some new techniques I want to try out


both from Amazon


The Torched Fired Enamel book I can have a go right away ~ so I will let you see what I do when I have had a play, very eager to get going on that one! I am also awaiting one that's only just been released and I am hoping that it will arrive on my Birthday which will be really cool!


so all there is left to say is ~~~~ here's to a


VERY HAPPY NEW YEAR
2014
 
to
Everyone


CHEERS!! <3


E x


Sunday 15 December 2013

Christmas Smash Sale

I am having a little SALE in my Bead shop on Etsy.

Christmas Smash on some of my new items - buttons and headpins.

I haven't been making much at this time other than getting Christmas sorted out. This is very rare for me usually I rush around in the last week before Christmas, not this year! I was determined to get organised and I am afraid creativity has ceased!!!

So all I have for you is my Red hair!!!


Swoosh


I love it this colour, my favourite!!!


80))


E x


Tuesday 10 December 2013

Top Tip Tuesday ~ Jewellery Basics Tutorial ~ Turning Loops

Jewellery Basics Techniques


I will be adding a number of Jewellery Basics to my blog along with other techniques in wirework.
 
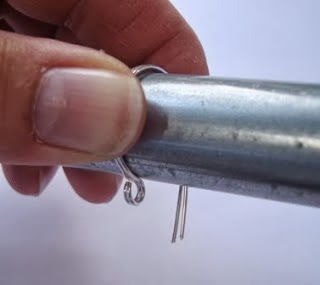
In this tutorial I will show you how to make a turned loop using both methods, I have used one single bead to show how to do it with a bead in place.  I recommend that you try a few times on some spare, old or cheap headpins to practice before making a pair of earrings, for instance.
 
A Turned Loop


1. On a headpin place on beads in desired pattern/design.  


2. Trim headpin down to approx. 1cm above the last bead.


3. Take the round nosed pliers, grasp the end of the headpin between the blades at the very tip.


Tip:

Ensure the tip of the pin does not protrude above the blades of the pliers, run your finger across the top of the blades ~ you shouldn't be able to feel the tip of the pin.


4.  Turn the pin around the blade pushing down with your thumb to form the loop, until you can't go any further.


5. Reposition your blades to continue with the loop until it closes, straighten you hands to allow you to continue comfortably


this should resemble a ‘p’ or ‘q’ shape 


6.  To finish the loop, place blade of pliers into the back of the loop


NB:  take careful note of the position of the blades in the loop
  

7.  Bend back the wire to centralise the loop above the bead  


You may need to ‘tweak’ the loop as the bending can cause the loop to open a little, to close it up, just place your blades into the front of the loop again and just pull around to remove the gap, making sure you have fully inserted the blade into the loop, otherwise the loop can distort.    
You could also squeeze the loop together using flat nosed pliers, very slowly and carefully ~ too much pressure could end up completely distorting the loop and destroying the circular shape of the loop.


                                         A Turned Loop
 
 
Turned Loop – Alternative Method

1.  Place beads onto a headpin, bend the pin back at 90° angle just above the bead


2.  Trim headpin to 1cm.  Grasp pin with round nosed pliers at the very tip.


3. Bend the pin around the blade to form the loop in the opposite direction to the bend        
                                          

Tip:

Use your other thumb to help guide the wire around the blade as before.


NB:
 
If the end of the wire sits above the bead, too high, then you can trim the wire and carry the loop round to close it once again.  This shortens the wire so bringing it down lower, nearer to the bead.


That's it all done!


Next time ~~

I will show you how to make a Wrapped Loop ~  a little more complex than the turned loop but definitely worth the effort to master this technique as it has many uses and is a very fundamental wirework technique.


Til next time

E x


Monday 25 November 2013

New Listings ~~~ Finally

Yes I have finally got to listing some jewellery into my ChatElaine Creations Etsy store.  My intentions are always good but get very sidetracked when I'm online (plus I have to admit I don't really enjoy listing it just takes such a long time!!!)


Tempest Seas in copper


So I will be trying to pop in a few things I made for Bead Magazine and maybe if I feel like making some earrings I will list those too.  I have been very off jewellery making lately, as I have been doing other things around the house instead! Like tidying up my work area and getting my beads storage more streamlined so I can actually find what I want, when I want it!

So Tempest Seas Pendant Necklace is now in my store, with copper wire and my own lampwork focal bead in it. I have one or two others to list still but I will get them up this week.


Cant believe how quickly Christmas is looming up, time to sort out my list to Santa, I think there will be tools on there somewhere! Ha ha!  80))


Till next time


E x


Tuesday 12 November 2013

Top Tips Tuesday ~~ Working with Wire ~~ Wire Gauges and When to use them!


Now Blogtoberfest 2013 is over I will be continuing with my Top Tips Tuesday spot.  

There will be a mixture of tutorials, information of jewellery making techniques and Top Tips!

I do hope this will be a very helpful resource for the beginner of jewellery making or maybe even for the intermediate jeweller. 


Working with Wire ~~ Part 2
 
Here is my table of wire gauges' information of when to use them and what to use them for!


Wire Gauge
 
 
What and When to use it
 
0.2mm (32g) or 0.3mm  (28g)
 
Very Fine wire, suitable for Crochet or Knitting with wire
 
 
0.4mm  (26g)
 
Mainly used for wrapping, coiling and weaving, all metals
 
 
0.5mm (24g) & 0.6mm (22g)
 
Used in wrapping or coiling, great for twisting in Tiara making. 
0.5mm in colour coated wire is great as decoration in weaving and coiling sometimes comes in 0.56mm
 
 
0.7mm  (21g)
 
Tends to come in the colour coated wire mainly.
Not always strong enough on its own and can still be a bit weak if used as a base wire for coiling or wrapping.
 
 
0.8mm (20g)
 
Very versatile. Good for making earwires, can be used as a base wire if wrapped/coiled in earrings or rings. This size is used in headpins and eyepins but has been stiffened, so will be great for making your own headpins, must be hammered to strengthen it.  
Will pass through most bead holes (pearls would have difficulty as they have very small holes)
 
 
1.00mm (18g)
 
Versatile like 0.8mm, similar uses too.  Good base wire can be used on its own without being wrapped/coiling but will need to be hammered to strengthen it.
Possibly will not pass through smaller holes in beads.
 
1.2mm or 1.25mm (16g)
 
Good as a base wire for most jewellery items ~ rings, bangles/bracelets, pendants, necklaces, brooches/fibulas/scarf rings, etc.
Can be wrapped with larger wires such as 0.6mm as well as smaller wires, would  be strong.  Can be more difficult to work with as stiffer but can be an asset but tougher on your fingers.
 
 
1.5mm (15g) or 1.6mm (14g)
 
Good base wire for larger jewellery items ~ such as bangles/bracelets, wire necklaces, brooches/scarf ring base/fibulas.  No wrapping necessary. Can be hammered but if finding difficult to do so may need annealing first to soften the wire so will make it malleable while working, then hammer to strengthen and stiffen again once finished manipulating wire.
 
 
2mm (12g)
 
Very large and stiff wire, will need annealing first before manipulating.  Self supporting,  good for bangles or bracelets maybe neckpieces ~ hammer to add decoration or manipulate it.


I do have more tips on the boil but please do leave any comments of things you would like to see me cover!  I do love to get comments so please do say hello!
 
See you next time.


E x


Sunday 10 November 2013

Chillin' out!

I did sort of end my Blogtoberfest rather abruptly but I was getting ready for my Wirework for Beginners workshop which was on Saturday 2nd November.  It went well and my ladies seemed to enjoy the day!

I took my camera with me but as usual forgot to get it out and take some piccies!  Maybe next time!

I taught them how to use wire and turn loops ~ we made some earwires, hammered them and I showed them how to make spirals and then coiled wire. They went home with their earwires ready to use, we did run out of time to finish them completely but they should be able to finish them at home.


Wrapped Loop


Making Earwires


So last week I had a bit of a chillin' out ~ time off from jewellery making, beadmaking and being online.  Family was top of my list!!  


Right, now I'm back its time to get cracking on my long list of 'THINGS TO DO'!! 

I do make lots of lists otherwise I just cant remember what I need to do, my memory is terrible and this is my only way of getting things done!

1. I intend to blog around 3-4 times a week

2. Make beads lots of new designs as well as revisiting old designs too.

3. Christmas shopping I am determined not to leave it until the last week before Christmas because I usually have so much jewellery making to do, for selling and for presents too.

GET STARTED!!

4. Have fun!!


80))


See you next time!

E x


Wednesday 30 October 2013

DAY 30 Blogtoberfest 2013

As Blogtoberfest draws to an end I do apologies for not getting around to visiting more of other bloggers also joining in, I still hope to try and visit some on the list but not until after Saturday when my workshop is over!

I have visited some of the Craft Pimp forum members but not as much as I would have liked.  Sorry guys I will try to improve!!


So tomorrow will be the Big Halloween preparation!  Billie has plans sorted and costumes organised.  Popped down the shops to get some last minute bits and pieces for the costume, so will be taking pics when she is all ready to go!!


HAPPY HALLOWEEN EVERYONE!! 


Have a spooktastic time!!


E x

Tuesday 29 October 2013

Top Tip Tuesday ~ Working with Wire


Working with Wire


What you need to know about working with wire!

Here is the first in my new series of Working with Wire.  It will include Top Tips on Tools and Wire Gauges ~ What to use & when and how to use it.

Top Tips    ~~  Stretching/Strengthening Wire


Before starting to work with wire it needs to be stretched or straightened, this strengthens and hardens it slightly, it also takes out a lot of the bends and light kinks it may have.

To stretch the wire, depending on the gauge -I will base it on 0.8mm (20g) wire, a pair of nylon coated jawed pliers are invaluable but you can use your own fingers (which is what I did for a number of years before getting my first pair of pliers).

Place the wire between the jaws of the pliers, starting nearest your hand, squeeze pliers and pull along the full length of your wire as far as your arms reach will allow. Now move the pliers to that position and carry on until the end of the wire. Repeat this action 2 or 3 times.


NB:  It is advisable to use around a 1m to 1.5m length of wire if you are using it for wrapping or coiling, if you use longer than this it is more likely to get tangled and kinked, plus can become difficult to handle and a possible chance of injury!


Wire makes a wonderful whipping noise through the air while working with it ~~ Love the sound but eye protection is necessary! 


~~~~~~~~~~~~~~~~~~~~~
 

Top Tips  ~~ Hammering Wire

 
When you have made your item, say for instance, a clasp/hook with a loop to connect a bracelet or necklace, you will need to strengthen it to stop it from bending or distorting.  Hammering the item will give it stability and strengthen it to stop it from doing this.

There are a couple of ways of hammering wire, it will depend on your chosen effect of the finished look to the piece!


Firstly, you have to decide if you would like a flattened look or a rounded look to your wire item:

Flatten Look ~ you can use a ball pein hammer on a steel block hitting the wire many times on the circular area of the clasp/hook or loop. You will also get hammering marks appearing which gives a slightly faceted look to the piece, this can enhance the feel of the piece and give it a more rustic effect.


NB:  Do not hit any wire areas where they cross over each other!


If you have a chasing hammer and prefer a much smoother feel to the piece then because of the lovely smooth, domed head of the hammer, it will not facet the item as much as the Ball Pein hammer. You can also use the round (ball end) head of the chasing hammer, this will leave slight indents in the wire and give a different type of finish altogether, to the wire.


Rounded Look ~ if you prefer to leave the wire in its natural rounded shape then the Rawhide Mallet is the hammer to use or a rubber mallet if you have one!  This hammer should not leave any marks on the wire or flatten it but it will still strengthen it.


Hope this is helpful.

Please comment if you would like any further advice!

I will come back when I have some photos to add, I couldn't find the photos I thought I had for this posting.


Next time ~ will be on Wire Gauges and when to use them.


E x